Showing posts with label DIY. Show all posts

Saturday, January 15, 2022

Sneaky Alien Automaton

I am in love with handmade automata. I especially adore wooden ones, but unfortunately the product of my woodworking skills and attention span has been insufficient so far for me to make one. BUT... I have a much higher attention span for coding up 3D models and printing them. So that's what I did.

Spaceman with hiding alien automaton.

The inspiration for my model is this cute scene by Alan Westby: 

He has a lot of neat models, sadly his website seems to be down now. 

*cut for 20 minutes of increasingly incredulous internet searching*

You guys, Alan Westby teaches (taught?) at a charter school in my hometown. What a small world. And he was a director at the Fox Cities Children's Museum while I was a child there. Mind blown. Anyway, the upshot is he has a facebook page where he shares some of his other models.

Moving right along. I designed the base and mechanisms for my model from scratch in OpenSCAD, a programmatic 3D modelling package. The mountains were modeled after someone's open source code for making printable table top strategy game terrain but I made so many changes I don't think any of the original code remains. The other models I borrowed from thingiverse: 

And here is the final product:

It was really fun to design and print, but did take forever. Next time I dust off my printer I may do some wildly modified version of a marblevator like this one from Greg Zumwalt. There are a lot of cool marblevator designs around.


Tuesday, June 15, 2021

Adventure Truck

My brother and his wife have been building out a custom camper van and it's super cool. I am v. jealous but I wasn't feeling quite that ambitious so Nick and I bought a little truck to spruce up as a camping-mobile. It's a black 2001 Ford Ranger, as yet unnamed. It should be much more capable on the forest roads than the Yaris is. We're planning to do a bed platform with a drawer or two underneath, we'll see how it goes.


Sunday, January 28, 2018

Yarn Monster vol. 1

In mid-December I found myself unexpectedly without anything brainless to knit during a work meeting. This posed a problem. I have to manage my focus level very carefully on long calls: if I pay 100% attention I will burn out in about 40 minutes, if I fall below 60% I'll lose track of what's going on. Offloading 25% of my mental energy onto easy yarncraft lets me stay engaged for as much as two hours. In desperation, I grabbed my trusty purple crochet hook and some scrap yarn and started making a hexagon. By the end of the meeting I had a ten round motif. I dug out some other leftovers and started making it sisters. They combined to form this:

Baby yarn monster, Portland 12/15/17.


and I lost my mind. I love everything about this little proto-blanket. I love using up my scraps. I love how quickly each motif stitches up. I love randomly selecting where to attach them and how colorful it is. I love its portability. 

I crocheted my way through San Diego, Chicago, and New London over the holidays. Since returning home I've dug out more scraps and continued to add to it. My plan is to make a ~4" x 6" blanket that I can use on my side of the bed. Sadly, our cat army would ruin any yarn-based blanket left exposed so it will have to be protected between quilts.  

Yarn monster in San Diego, 12/19/17

Yarn monster in Chicago, 12/24/17

Yarn monster in New London, 12/31/17

Thursday, July 27, 2017

Finished Fatty Lumpkin horse

I finished my crocheted n-gon horse quite a while ago, but never posted a picture. This post is to remedy that. I'm very happy with how he turned out, I think he's really cute. He's pretty big. I used thicker yarn than the pattern called for and I suspect I'm not the tightest crocheter around. Consequently, he isn't really structurally sound on his own. I put paper towel tubes in his legs and neck and used string to keep his feet from splaying out. That all contributes to his majestic charm. He spends his days monitoring our goings on from the platform at the bottom of the stairs. 

Fatty Lumpkin crocheted horse

Fatty Lumpkin crocheted horse

Tuesday, July 18, 2017

Cherriversary

We passed the one-year anniversary of our move to Portland last week. The first full weekend we were in town, basically as soon as we had a car, I dragged Brian up to the Hood River Gorge and we picked 40 pounds of tart cherries. We pitted them by hand over the next few days and froze them in 9 cobbler-sized portions. I've been slowly using them in pies and cobblers, drying them in the oven, and making syrup from the juice. We're now down to one bag. To mix things up, this year I got a cherry pitter (amazing, best invention ever) and a Presto Dehydro food dehydrator. Sadly, they were out of tart cherries at the orchard so we had to content ourselves with 20 lb. of dark sweet cherries, mostly Lamberts with some Bings. 

2016 cherry haul.

I've only used a real food dehydrator once, to make trail fruits for a backpacking trip in high school. The one I got is pretty similar - round trays stacked over a heat source and fan - and works pretty great. I dried a bag of the frozen tart cherries and a bunch of the new sweet ones. The tart cherries dried a lot faster, the freeze-thaw process releases a lot of juice, but they are pretty beat up from being hand-pitted and frozen. I really like their flavor dried, it's very intense. The pitter did a great job on the sweet cherries, leaving only two small holes. That meant they took close to 30 hours to dry down to a reasonable plump-raisin level. They are milder in flavor than the tart cherries, but still nice. I think I might try coating some with dark chocolate. Yum.

This year's bucket of cherries, and Mt. Hood.
Tart and sweet cherries in the food dehydrator.

Monday, June 12, 2017

Oceanside rocks

Brian and I got one rock-hunting trip in before winter ended. We went to three beaches on the north Oregon coast. The first two were up near Highway 26 and didn't yield much in the way of rocks. And we got rained on a lot. Luckily I had my new Columbia rain coat on. We almost gave up but then decided to drive down to Oceanside beach, where we had better weather and found a ton of great rocks. 

Oceanside rock hunt prizes.
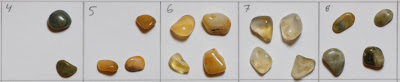
That's about 7 lbs of rocks. My tumbler only holds 3 lb so I picked the agates (the white pile on the right and the center pile) and added a few of the green guys and the black rocks with embedded agates. I skipped the coarse grind step and added a third polish step with 1000 grit alumina to hopefully get a higher shine more quickly. Here is the polishing progression:

As-found beach rocks.

After 1 week of medium grind (180/220 grit SiC).

After 1 week of pre-polish (500 grit SiC).

After 1 week of mid-polish (1000 grit alumina).

After 1 week of polish (1200 grit alumina) plus burnished 1 day with Ivory soap.
This is a pretty small subset of the batch, the whole pile looks like this:

Oceanside rocks before tumbling.
Rocks after tumbling.

Friday, April 21, 2017

Yachats rocks

In the Cape Perpetua visitor center I learned that the volcanic rock on the Oregon coast is full of agates. As streams and waves wear down the rock the agates break free and wash up on the beach. You can find them among the rocks as the tide goes out. So while Nick perused the tidepools I scoured the gravel for anything vaguely translucent. 

By the end of our time in Yachats I had a pretty good handful of potential agates. Nick got me a rock tumbler for an early birthday present so I could polish them up. It seems that people generally polish rocks in four stages: gross shaping, minor shaping, pre-polish, and polish. I decided to skip the gross shaping step to keep my rocks in more irregular beachy shapes. The trade-off is that some of them would retain pits and depressions that won't polish up that well. I took photos before and after, because science. I think they came out pretty well. Each square in the pictures below is 1" x 1". Number 63 is my favorite.

Tiny rocks pre-polishing.

Tiny rocks after polishing.

Biggish rocks pre-polishing.

Biggish rocks after polishing.


Sunday, April 16, 2017

Cider bottled

Nick and I bottled up the cider this morning. We tasted it last week and thought it was coming along pretty well. It's dry and a tiny bit fizzy and tastes like apple. We added some brown sugar syrup to give the yeast something to work with then sealed it up and put it back in the closet. We'll check on the fizziness level in a few days.

Cider in bottles.

Monday, March 20, 2017

First attempt at cider

Nick and I decided to try brewing cider. The first batch is some real high-brow stuff: 3 gallons of apple juice from concentrate, straight up. It is burbling merrily away in the closet under the stairs. Check back in a month.


Monday, December 5, 2016

I put up a Christmas tree

I've noticed over the past couple of years that every time we hike through a pine grove I really enjoy the piney forest smell. So this year I decided to bring some forest home and do a Christmas tree for the first time. It was super fun. Nick and I picked it up on Saturday and got some cider fixings. I put the lights and ornaments on while the cider mulled. Then I sat on the couch and stared at it for a bit. 

My tree aesthetic is pretty similar to Mom's: the lights are white, there are a million of them, all the ornaments are shiny. The cats are being very civilized about the whole thing, they act like it's been there all along. I did avoid hanging any ornaments below the lowest branches to minimize temptation. I really like it and it smells great. Happy holidays everybody.


Sunday, November 29, 2015

Spinning! (new hobby)

I enrolled in a spinning class with a college friend who recently moved to the area. The local yarn store hosts a two-session class with a very nice guy named Aaron. He somehow keeps a calm, even tone while all of his pupils are simultaneously creating massive wool nests and tangling their wheels up in ridiculous ways. 

The shop rents wheels to students, I got an Ashford Traditional (below right) and Anna got an Ashford Kiwi. I tried them both. The Kiwi is easier to keep going the correct direction, but my foot synchronization was off and I kept speeding up while using it. I've established a nice, nearly comatose treadling pace on the Traditional. 

Two Ashford spinning wheels in the dart room.

Our homework between classes is to fill two bobbins with yarn. During the second class we'll learn to ply them together. My first bobbin has quite a few corkscrews, I had some trouble getting my braking tension set properly. I've dialed it in better and I'm pretty pleased with the second bobbin. 

I was wondering to myself how long it would be before I rate colorful roving. Then at second Thanksgiving Anna kindly gave me some pretty purple stuff from her stash. I tried co-spinning it with some of the class roving. That was pretty tough. The purple was harder to draft so I kept ending up with patches of only one color. There must be some technique to blending the rovings.  I'm not sure I love the candy-cane look of purple on white but it might be nice with a more subtle color difference. 

First bobbin of yarn. I think this is the Corriedale.

Fun purple and grey gift-roving.

My second bobbin, probably Falkland. Half full with some purple and white candy-cane.


Sunday, July 26, 2015

Solar powered apple dryer

Nick, Scott and I are constructing a solar powered apple dryer to improve our dehydration efficiency come autumn. Last year we used the oven and a big computer fan. It was non-ideal: too little space, too high of a temperature, too great a risk of melting a computer fan. 

Scott modified the very swanky design described here to reflect our more modest aims; and the fact that we already had a spare storm window and bookshelf. Today we assembled the heat generation zone. Next it needs racks, doors, and a vent. Then we just need a sunny day and some test apples.